Make maple syrup
Make Your Own Maple Syrup!
Even, if you have only a few sugar maple trees, you can make your own maple syrup and sugar. The basic method has not changed over the last several hundred years. You boil off the water in the sap to get the sweet syrup. It’s work! But it is fun and rewarding.
What Will You Need?
- A drill and a bit to bore the hole that is sized based on your taps. To preserve tree heath and sustainability, tap holes should be as small as possible.

- Taps for each hole. Manufactured taps can be purchased from a maple equipment dealer or you can make them yourself. To make a wooden spout, select an elderberry stem a little larger than the hole to be filled. Cut it off four or five inches long. Sharpen one end to go into the tap hole. Use a slender rod to push the pith or heart wood out of the center and you have your spout.

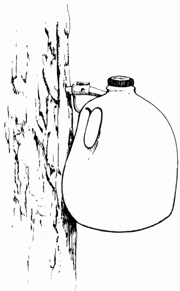
- One container per tap hole to catch the sap, such as a metal or plastic bucket. Very serviceable containers can be made from plastic gallon milk or cider jugs. These work well in combination with a wood, metal, or plastic spout. Use a small electric drill or other cutting implement to make a hole in the top of the flat side of the jug. Enlarge the hole so that it can be slipped over the spout.
- For storing freshly gathered sap use clean plastic or metal tubs or pots, or large pails or food-grade tanks.
- Any deep metal pan like a canner or wash tub that will hold five gallons or more can function as an evaporator pan for boiling the sap.
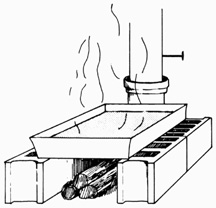
- A fireplace or picnic arch in your back yard, even one temporarily made from brick, stone or cinder blocks to fit your boiling pan is adequate. A wood stove set up outdoors is also suitable. Don’t use your kitchen stove indoors or you are sure to have trouble (the amount of steam will make your walls and ceilings very sticky!) and a very high fuel bill.
- Dry, fast-burning wood is essential to provide the heat necessary for boiling. Slab wood, dead trees, etc. are suitable.
- For testing to see when the syrup is done you need a syrup or candy thermometer.
- Finished syrup should be stored in clean metal containers or glass jars that will seal—canning jars are ideal.
- Caution: Be sure all collecting, boiling, and storing containers are clean to avoid off-flavor and other problems.
How to Do It
- Be sure your trees are maples. A tree should be at least 12″ in diameter for one tap hole and bucket. Trees more than 24″ in diameter can have two taps.
- Drill the hole 2″ deep at a convenient height. Look for unblemished bark and do not bore directly over or under a former tap hole or closer than 4″ from the side of an old tap hole. The hole should be straight into the tree, parallel with the ground.
- Drive the spout in so that it is tight and can not be pulled out by hand, but don’t over-drive and split the tree.
- Hang your bucket or container on the hook of the spout if it is a purchased one, or, if you have made your own, fashion a length of wire to serve as a hanger. Be sure to cover the bucket to keep out rain, snow and foreign material.
- Make sure your fireplace is ready, wood at hand, and pan ready for the sap.
- When you have enough in your buckets to fill your pan for boiling, you are ready for the fire. Do not fill your pan to the top as it will boil over. As the water boils away keep adding more sap to the pan. Do not have less than an inch in the pan or it may burn down. You can pour the cold sap right into the boiling sap. It will take a lot of boiling to get it to syrup as it takes about 10 gallons of sap to make one quart of maple syrup. A chimney of brick or stove pipe (4 to 6 feet long) on your arch or fireplace will be helpful in keeping the smoke away from the boiling sap so that the syrup will not darken or have an off-taste from the smoke.

- Do not leave an accumulation of sap in the collecting buckets, especially in warm weather. Sap is like milk and will sour if left in the sun. Try to keep the sap in storage as cold as possible. Boil it as soon as you can.
- Finished maple syrup will be 7°F above the temperature of boiling water at your elevation. Your syrup or candy thermometer will tell you this. If you have a larger operation you may get a syrup hydrometer and testing cup which will tell you when the syrup is done. The cup will require two or three cupfuls of syrup in order to make the test. Proper syrup will weigh at least 11 pounds per gallon. Do not get it beyond 11 1/4 pounds per gallon or it may form crystals in the bottom of the storage container.
- Pour the hot syrup through a felt syrup filter or a special strainer as carried by equipment dealers. If you have neither one, a double layer of outing flannel may be used, or you may put the syrup in a container and let it cool for 12 hours or more. Sediment will settle to the bottom of the container and the clearer syrup may be carefully poured off. This syrup should then be reheated to at least 180°F or almost to boiling before it is poured into containers for final storage.
- Pour the hot syrup into the clean, sterile canning jars and seal. Fill them full so that very little air remains in the jar. If laid on the side while cooling a better seal will result.
- Store syrup in a cool place. A freezer is ideal. Properly prepared syrup will not freeze and a poor seal will not be as important when stored in a freezer.
- You may also want to visit a commercial maple producer to pick up tips on how to make syrup. Most producers are friendly and will welcome your questions.
further reading
Some good books that can help you get started in sugarmaking include:

